Call Recording Transcription and Sentiment Analysis
Table of Contents
Prerequisites: What is Transcription & Sentiment Analysis? Enable Call Recording for Individual Users View Call Transcriptions To enable voicemail transcription for a user:Prerequisites:
Access to the portal with Office Manager or greater scope.
This is a billable add-on feature, please contact your representative to discuss pricing options.
What is Transcription & Sentiment Analysis?
Call Recording Transcription is the conversion of audio to plain text. Sentiment Analysis is a powerful (and optional) add-on feature that interprets this text into qualitative terms (the text was neutral, positive, or negative) and then quantifies it (2 neutral segments, 3 positive, 1 negative).
This article explains the system's call recording, transcription, and sentiment analysis basics.
Call Transcription: This tool will automatically parse the user's call recordings, transcribe them, and then separate the text by the speaker for a visual representation of the conversation.
Sentiment Analysis: This technology uses word choice to rate the times a speaker is positive, negative, or neutral. The sentiment is graded by text only and may not reflect contextual or inflection-based sentiment.
Enable Call Recording for Individual Users
Enable call recording transcription for individual users. Once enabled, transcription options will be visible under the user's profile screen (and the user's voicemail screen for Unified Messaging).
To set call recording transcription for specific users:
1. Log in to the Portal with an Office Manager or above user scope. Click User from the top navigation menu. Select the user who needs call recording transcription.
2. Next, click on the user's Profile tab and scroll down to Record User's Calls. Select "Yes w/transcription" or "Yes w/ transcription and sentiment analysis" (the latter option is only available if sentiment analysis has been enabled). Click Save at the bottom of the screen to save the changes.

View Call Transcriptions
1. Call recording transcriptions reside in the Portal under Call History.

2. Call recording and transcription services must be configured (including enabled for the user) before a call will show transcription on this page.
3. Now, place a call. Come back to the Call History page. Find the call in the list and wait for the recording server to process the recording and the transcription. Click Refresh a few times.

4. The audio player icon will show as "pending conversion." If the audio player is greyed out and not pending, then recording has not been enabled.

5. Another refresh (about 1-2 minutes later, but it's entirely dependent on the file size) will now show the standard playback bar as "listen." Click to play, listen, and download the audio file (the icon with 3 vertical dots) as needed.

6. One last refresh (again, the actual amount of waiting time is unique every time), and now the transcription with or without sentiment analysis will be displayed by clicking on the same audio player icon.
Transcription with Sentiment Analysis
In this scenario, transcription services AND sentiment analysis have been enabled. The "record user's calls" option within the user's profile page is set to "yes, w/ transcription and sentiment analysis.”
In Call History, use the filter to narrow the search to the user. Ensure that the Sentiment and Closing Sentiment columns are selected to be visible.

Click the listen button to select the recording you are interested in reviewing. The listen button is the third Icon in the icons presented at the end of the column on the right-hand side of the page.

The Call Transcript page loads.
|
Summary Tab Selected |
Topics Tab Selected |
- Click to play or search (usually by speaker) within the text.
- The sentiment data attempts to quantify the overall mood of the text itself by using colors to illustrate the various segments. The audio progress bar and text are separated into the color of the corresponding sentiment. As the sentiment analysis only analyzes text, it cannot detect audio tone or context and, therefore, will miss inflections. For example, it cannot pick up on people speaking sarcastically.
- The transcript can be viewed via the Summary view or the Topics view.
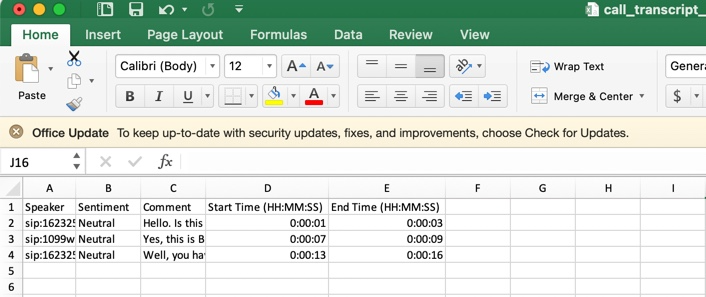
The sentiment analysis can be downloaded. Click Download Transcript. The download will look similar to the example below. "Sentiment" has a dedicated column, and each row reflects a new part of the conversation, just like in the visual display.
Transcription Only
In this scenario, only transcription services have been enabled. The sentiment configs are not enabled, and "record user's calls" within the user's profile page is set to "yes w/ transcription".
- Click to play or search (usually by speaker) within the text. The data uses colors to illustrate the various segments, similar to sentiment but without interpreting the mood of the conversation.
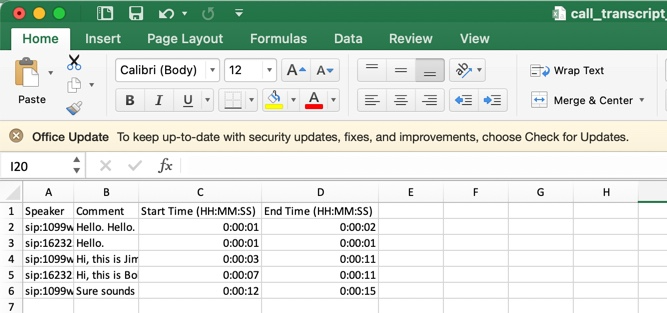
The transcription can be downloaded. Click Download Transcript. The download will look similar to the example below. Each row reflects a new part of the conversation, just like in the visual display.
To enable voicemail transcription for a user:
1. Navigate to the Portal > Users and select a specific user. Click on the user's Voicemail Tab.
2. Voicemail transcription is enabled per user using the highlighted fields below.
- Next to Voicemail Transcription, select the 3rd party provider and choose whether to send an email when the mailbox is full and/or after missed calls.
- Check the box for Email Notifications. This will then display the Email Type and After Email Notification options. Note that "brief" options will not include the transcribed text. If the user wants the transcription accessible elsewhere besides their email (the Portal, Web Phone, UC Softphone), select "leave as new" for the After Email Notification choice.

3. After modifying the above fields and clicking Save, users will see their voicemails transcribed. Navigate to a User > Messages. The transcription will display the voicemails below going forward (and via email, depending on the user's above configuration).