Working With Call Queues
Table of Contents
Prerequisites: Displaying the Call Queues Page Adding and Configuring Call Queues Round Robin Ring All Linear Hunt Linear Cascade Call Park Editing Call Queues Deleting Call Queues Adding Music on Hold to a Queue Working with Agents FlowchartPrerequisites:
- Manager Portal access with Office Manager scope.
This article will go over Call Queue creation, features, and management.
Displaying the Call Queues Page
All call queue tasks are performed from the Call Queues page. To display this page, click the Call Queues icon on the menu bar:
The following figure shows an example of the Call Queues page. The button at the top-right side of the page refreshes the information.
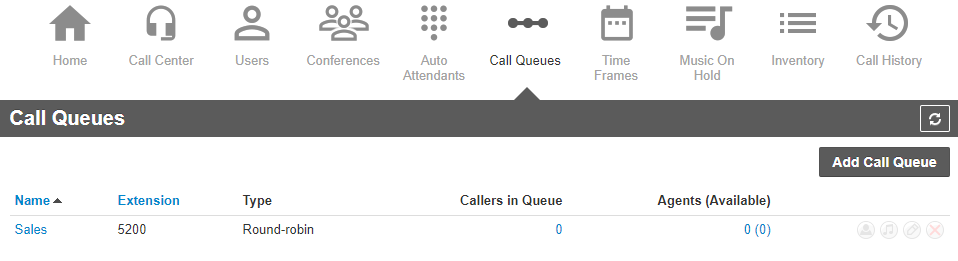
Adding and Configuring Call Queues
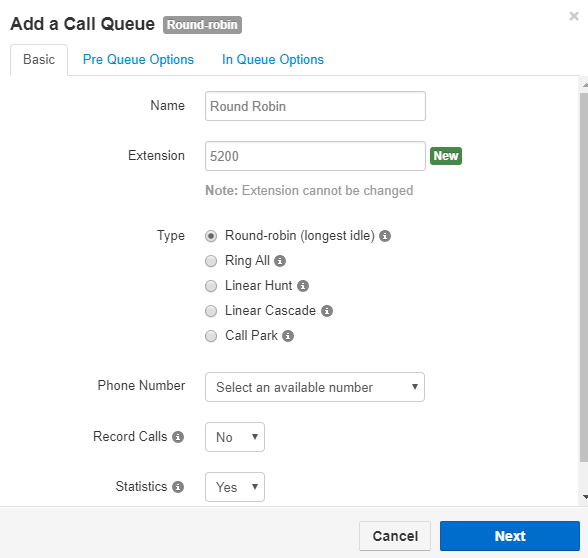
Round Robin
Round Robin is a queue that routes callers to the available agent who is idle the longest. Select the “Round-robin (longest idle)” button to enable round-robin.
Basic Tab Fields
- Available Phone Numbers can be assigned to a call queue from the Phone Number drop-down box.
- If Recorded is selected, then calls routed through this queue will be recorded.
- If Statistics is selected, the system generates call queue-related information for reporting.
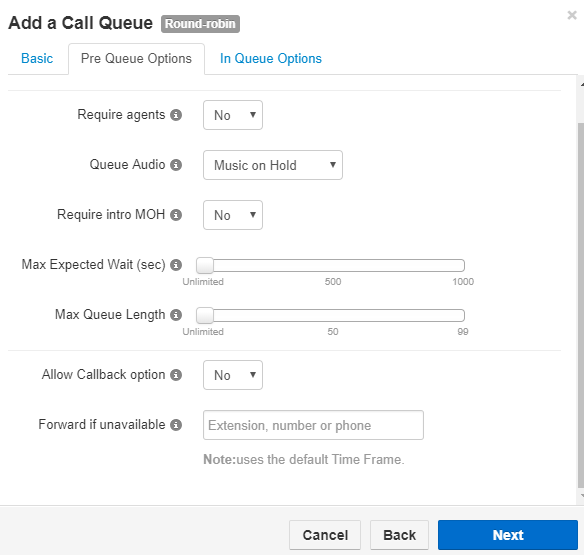
Pre-Queue Option Fields
- Require agents sets whether at least one agent must be online before sending a caller to the queue.
- The maximum expected Wait is the number of seconds before the queue is unavailable to new callers or when the callback option is presented. It applies when the queue's average wait time reaches the maximum expected wait.
- The Max Queue Length is the maximum number of callers allowed in the queue before it is full and unavailable to new callers.
- The Allow Callback Option allows the system to prompt the user for a callback option instead of waiting, which depends on the maximum expected wait time. The prompt for the callback will first play when the timer for "Max Expected Wait" reaches its limit and will repeat each time that limit is reached (i.e., if the max expected wait is set to 3 minutes, every 3 minutes, the user will be prompted to request a callback). This also represents how frequently the callback will be attempted for available agents.
- The Forward if unavailable option will be used if the queue reaches the maximum wait or is full.
In Queue Tab Fields
- The Queue Ring Timeout is how long the queue will attempt to ring agents before following forward if unanswered.
- The Agent Ring Timeout is how long the queue will ring agents before moving on to the next available. This should be less than the Queue Ring Timeout.
- You can set if you want an agent to be logged out of the queue if they miss a call.
- If agents fail to answer before the Queue Ring Timeout, the Forward, if unanswered, will be used.
- Callers will be sent to the queue's voicemail if agents fail to answer before the Ring Timeout and Forward if unanswered is not set. This will also trigger the system message, “Please continue to hold or Press 2 to leave a voicemail,” and then return the call to the queue if nothing is pressed.
NOTE: the voicemail box used if you press 2 will be the call queues system user mailbox.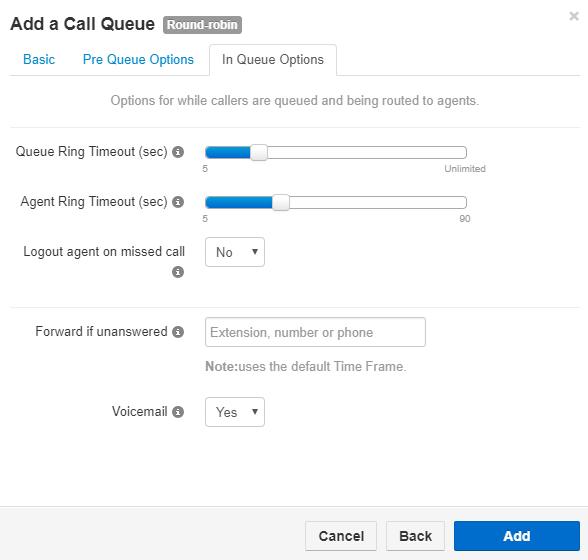
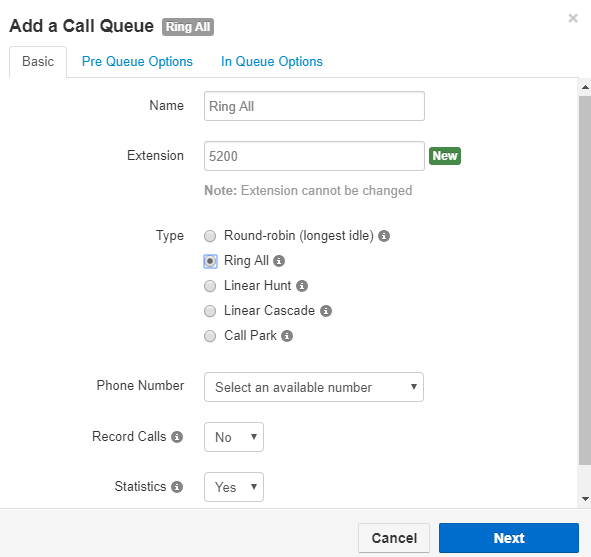
Ring All
Ring all configuration is a call queue configuration that simultaneously rings all available agents of the queue's hunt group. To enable ring-all, select the button that displays "Ring All".
Basic Tab Fields
- Available Phone Numbers can be assigned to a call queue from the Phone Number drop-down box.
- If Recorded is selected, then calls routed through this queue will be recorded.
- If Statistics is selected, the system generates call queue-related information for reporting.
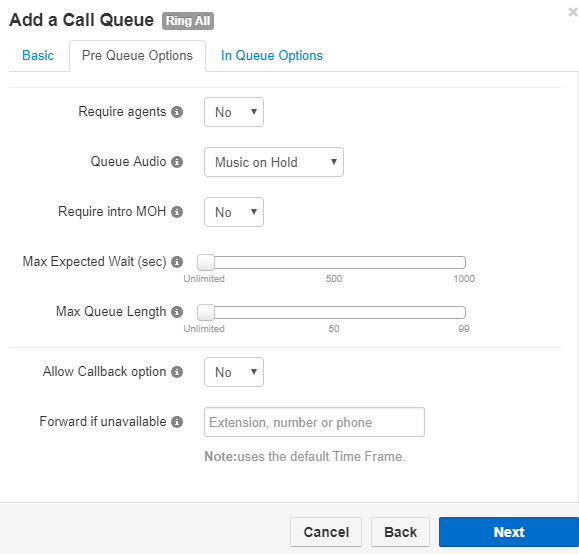
Pre-Queue Tab Fields
- Require agents to set whether at least one agent is required before sending the caller to the queue.
- The Max Expected Wait is the time in seconds before the queue is unavailable to new callers. This applies when the queue's average wait time reaches the maximum expected wait.
- The Max Queue Length is the maximum amount of callers allowed in the queue before it's full and unavailable to new callers.
- The Allow Callback Option allows the system to prompt the user for a callback option instead of waiting, which depends on the Max Expected wait time. The prompt for the callback will first play when the timer for "Max Expected Wait" reaches its limit and will repeat each time that limit is reached (i.e., the max expected wait is set to 3 minutes, and every 3 minutes, the user will be prompted to request a callback). This also represents how frequently the callback will be attempted for available agents.
- The Forward if unavailable option will be used if the queue reaches the maximum wait or is full.
In Queue Tab Fields
- The “Queue Ring Timeout” is how long the queue will attempt to ring agents before following forward if unanswered.
- If agents fail to answer before the Queue Ring Timeout, the Forward, if unanswered, will be used.
- Callers will be sent to the queue's voicemail if agents fail to answer before the Ring Timeout and Forward if unanswered is not set. This will also trigger the system message, “Please continue to hold or Press 2 to leave a voicemail,” and then return the call to the queue if nothing is pressed.
NOTE: the voicemail box used if you press 2 will be the call queues system user mailbox.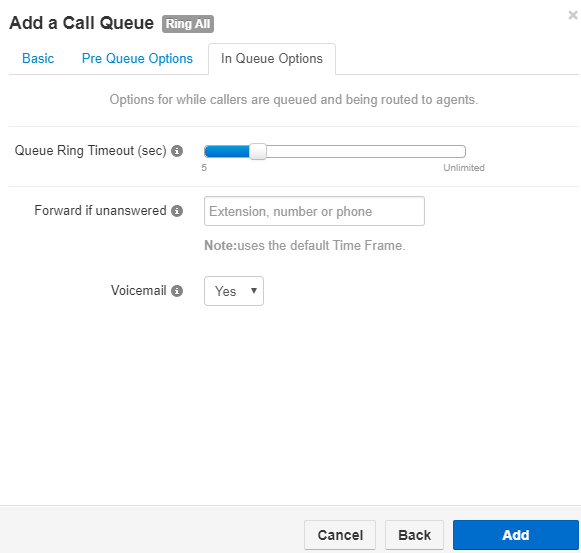
Linear Hunt
Linear hunt is a call queue configuration that routes callers to available agents in groups. The order of these groups is defined when editing the queue's agents. To enable linear hunt, select the button that displays “Linear Hunt.”
Basic Tab Fields
- Available Phone Numbers can be assigned to a call queue from the Phone Number drop-down box.
- If Recorded is selected, then calls routed through this queue will be recorded.
- If Statistics is selected, the system generates call queue-related information for reporting.

Pre-Queue Tab Fields
- Require agents sets whether at least one agent must be online before sending the caller to the queue.
- The"Max Expected Wait" is seconds before the queue is unavailable to new callers. This applies when the queue's average wait time reaches the maximum expected wait.
- The “Max Queue Length” is the maximum number of callers allowed in the queue before it's full and is unavailable to new callers.
- The “Allow Callback optopm” allows the system to prompt the user for a callback option instead of waiting, which depends on the Max Expected wait time. The prompt for the callback will first play when the timer for "Max Expected Wait" reaches its limit and will repeat each time that limit is reached (i.e., if the max expected wait is set to 3 minutes, every 3 minutes, the user will be prompted to request a callback). This also represents how frequently the callback will be attempted for available agents.
- If the queue reaches the maximum wait or is full, the Forward if unavailable option will be used.

In Queue Tab Fields
- The Queue Ring Timeout is how long the queue will attempt to ring agents before following forward if unanswered.
- The Agent Ring Timeout is how long the queue will ring agents before moving on to the next available. This should be less than the Queue Ring Timeout.
- You can set if you want an agent to be logged out of the queue if they miss a call.
- If agents fail to answer before the Queue Ring Timeout, the Forward, if unanswered, will be used.
- Callers will be sent to the queue's voicemail if agents fail to answer before the Ring Timeout and Forward if unanswered is not set. This will also trigger the system message, “Please continue to hold or Press 2 to leave a voicemail,” and then return the call to the queue if nothing is pressed.
NOTE: the voicemail box used if you press 2 will be the call queues system user mailbox.
Linear Cascade
A linear cascade configuration is a call queue configuration that routes callers to groups of available agents, adding each group to the next ring group so that they can all ring simultaneously. The order of the groups is defined when editing the queue's agents. To enable linear cascade, select the radio button that displays “Linear Cascade.”
We find that a lot of users confuse linear hunt and linear cascade, so the following is provided for clarification:
We have 4 agents in a queue; using numbers 1 through 4 to identify them, you'd have the following example:
A linear hunt order rings like this
1
2
3
4
Whereas linear cascade order rings like this
1
12
123
1234
Basic Tab Fields
- Available Phone Numbers can be assigned to a call queue from the Phone Number drop-down box.
- If Recorded is selected, then calls routed through this queue will be recorded.
- If Statistics is selected, the system generates call queue-related information for reporting.

Pre-Queue Tab Fields
- Require agents sets whether at least one agent must be online before sending the caller to the queue.
- The “Max Expected Wait” is the seconds before the queue is unavailable to new callers. This applies when the queue's average wait time reaches the maximum expected wait.
- The “Max Queue Length” is the maximum number of callers allowed in the queue before it's full and is unavailable to new callers.
- The “Allow Callback Option” allows the system to prompt the user for a callback option instead of waiting, which depends on the “Max Expected wait” time. The prompt for the callback will first play when the timer for "Max Expected Wait" reaches its limit and will repeat each time that limit is reached (i.e., if the max expected wait is set to 3 minutes, every 3 minutes, the user will be prompted to request a callback). This also represents how frequently the callback will be attempted for available agents.
- The “Forward if unavailable” option will be used, if the queue reaches the maximum wait or is full .

In Queue Tab Fields
- The Queue Ring Timeout is how long the queue will attempt to ring agents before following forward if unanswered.
- The Agent Ring Timeout is how long the queue will ring agents before moving on to the next available. This should be less than the Queue Ring Timeout.
- The Initial Agent Group to Ring refers to the number assigned to agents when adding them to the queue later. Here, you assign which number will ring. This is the first group of agents in the linear cascade.
- Agent Group to Add After Timeout adds an additional group of agents to ring when the Agent Ring Timeout is reached. The queue will ring the first group of agents and simultaneously add agents with the chosen order or lower. For example, if you choose 5 for Initial Agent Group to Ring and 5 for this option, it will now ring all agents with Order 10 or lower. It will add 5 and ring all agents with that Order or lower on every Agent Ring Timeout that is reached. If you have any questions about how this works, it's best to create a test configuration to understand how Linear Cascade Queue works.
- You can set if you want an agent to be logged out of the queue if they miss a call.
- If agents fail to answer before the Queue Ring Timeout, the Forward, if unanswered, will be used.
- Callers will be sent to the queue's voicemail if agents fail to answer before the Ring Timeout and Forward if unanswered is not set. This will also trigger the system message, “Please continue to hold or Press 2 to leave a voicemail,” and then return the call to the queue if nothing is pressed.
NOTE: the voicemail box used if you press 2 will be the call queues system user mailbox.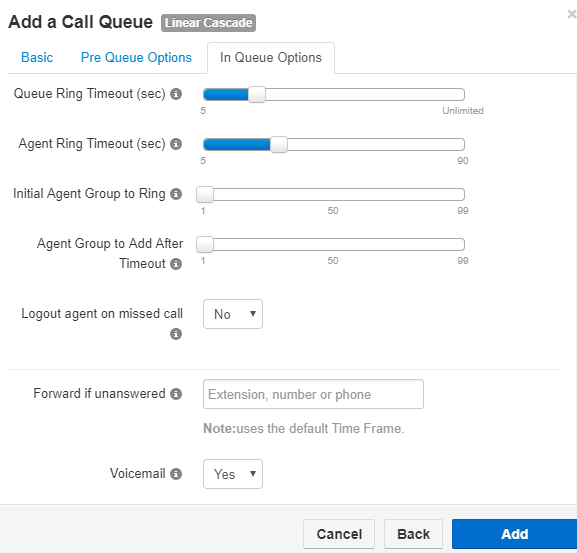
Call Park
Call Park configuration is a call-queue-like configuration that places callers on hold until an agent retrieves them. To enable Call Park, select the radio button that displays “Call Park”.
Basic Tab Fields
- Only the name and extension of the Call Park are needed to create the Call Park.
- Phone Numbers assigned to the inventory as Available Numbers can be assigned to a call queue from the Phone Number drop-down box.
Note: Call Parks can be configured using the proper extension convention 5801-5820 for Static Call Parks or 5101-5110 for Dynamic Call Parks.
Static Call Parks are queues in which the agent who answers the phone must specify where they place the caller on hold. For example, if they want to park the client on Queue 5801, they can use the transfer feature to transfer the call to 5801, which will then park the caller on hold at that extension. The agent may then go to another desk and retrieve that call by dialling extension 5801.
Dynamic Call Parks are queues in which the agent who answers the phone does not need to specify where they are placing the caller on hold. For example, if they wanted to park the client, they would press * * * (the star key 3 times) and listen for the system prompt to tell them the extension the call is parked on hold at, i.e., "The call is now parked at 5101." The agent may then go to another desk and retrieve that call by dialing extension 5101.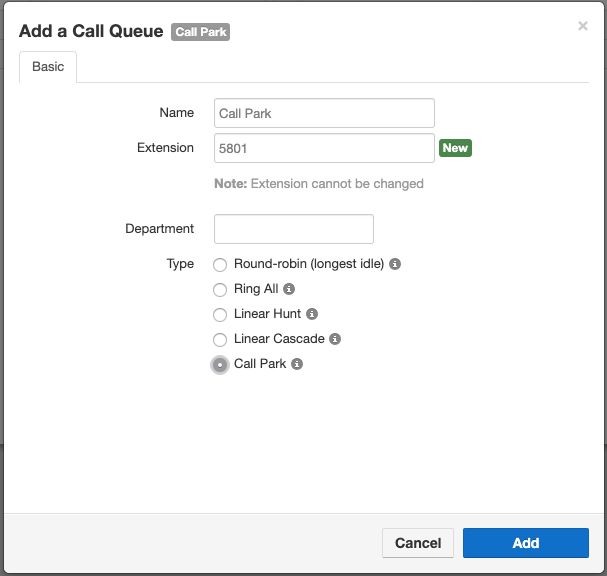
Editing Call Queues
There might be times when you need to edit Call Queues. For example, you might want to change basic, pre-queue, or in-queue options.
- From the Call Queues page, either:
– Click a name
OR
– Hover over a name, and then click the icon at the far right of the Call Queues page. For example:
Either step displays the Edit pop-up window. For example:
- Perform the procedure starting with step 2 under “Adding Call Queues”
Deleting Call Queues
You can delete it from the system if you no longer need a call queue.
- From the Call Queues page, hover over the call queue, then click the
 icon at the far right of the row. A confirmation prompt appears.
 - Click Yes to delete the call queue or No to retain it.
Adding Music on Hold to a Queue
The Call Queues page allows you to add Music on Hold for individual call queues.
From the Call Queues page, hover over the call queue, then click the icon at the far right of the row. The Music On Hold page appears. Here is where you would set the Music on Hold files you uploaded. This is separate from the main Portal Music on Hold section.
Working with Agents
The Call Queues page allows you to add, edit, and delete agents for call queues.
- From the Call Queues page, hover over the active and inactive queues, then click the icon at the far right of the row.
An Edit Agents pop-up window similar to the following appears.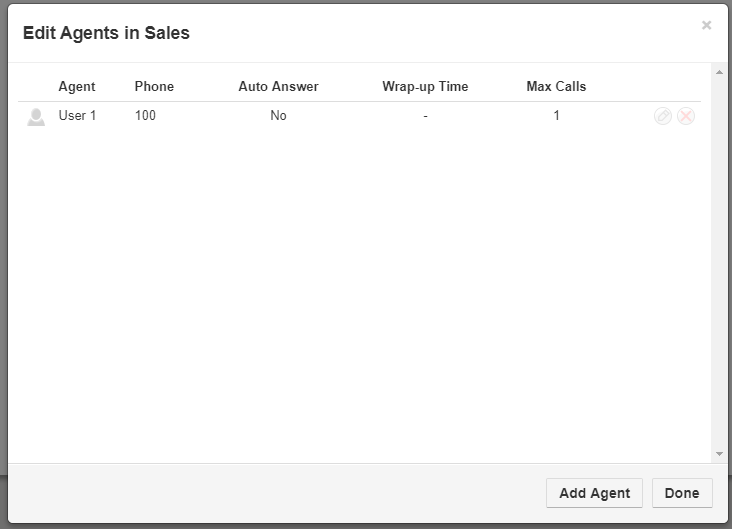
- To add an agent:
- Click the Add Agent button. The following settings appear.
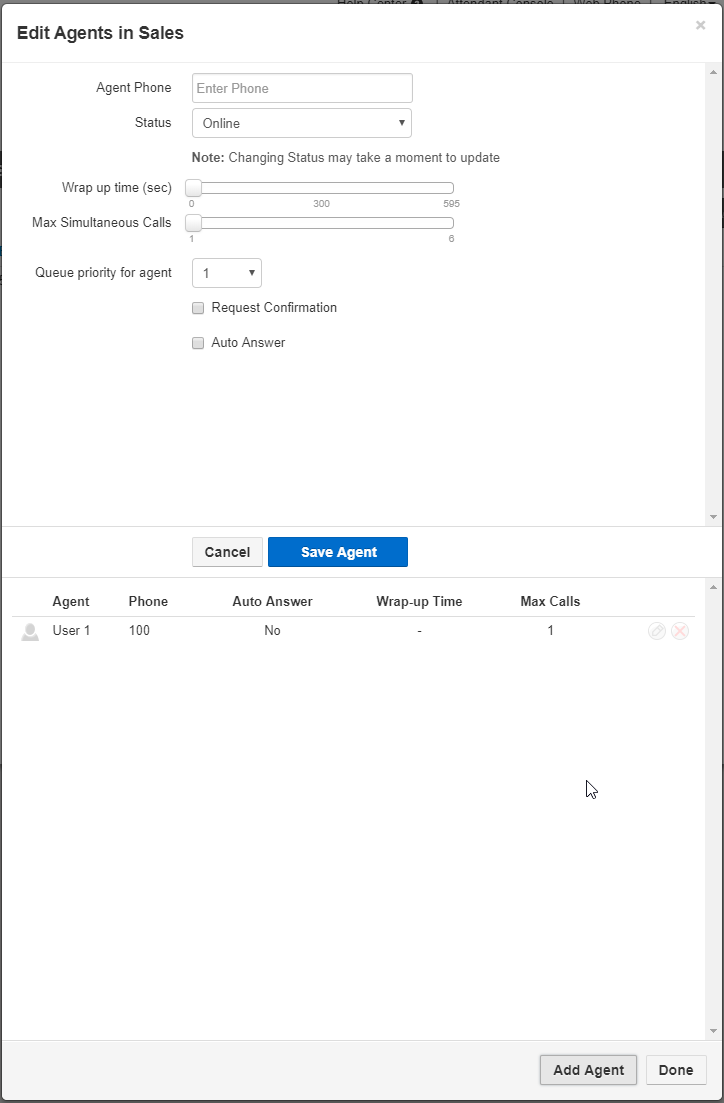
- Complete the fields
- Click Save. The color-coded status of the new agent is displayed:
– Green = available
– Gray = offline
– Red = on a call
- Click the Add Agent button. The following settings appear.
| Setting | Description |
| Agent Phone | Select a phone of an agent to add to the queue. |
| Status | Select whether the agent is ready to take calls (Online) or not active (Offline). |
| Wrap up time | Use the slider to specify the amount of time the agent is allocated to complete paperwork after finishing a call and before a new call is dispatched. |
| Max Simultaneous calls | Use the slider to specify the maximum number of calls an agent can take at one time. This will almost always be 1. |
| Order in Linear Hunt | Sets the dispatch order. If a call is dispatching, it will go to the available agent with the lowest order. |
| Queue priority for agent | Sets weighting for an agent that is servicing multiple queues. If you have an agent servicing two queues and both queues have a person waiting, auto-answer the agent will get the call from the queue whose priority is highest (lowest number). |
| Request Confirmation | Enables or disables request confirmation. Choices are: Checked = requires the agent to confirm receiving the call. Not checked = agent does not confirm the call. |
| Auto Answer | Enables or disables auto-answer. Choices are: Checked = agent phone answers automatically (not all phones support this feature). Not checked = agent phone does not answer automatically. |
- Click Done.
- To edit agent settings:
- Hover over an agent, then click the
 icon at the far right of the window.
Settings similar to the following appear.
- Complete the fields.
- Click Save. The color-coded status of the new agent is displayed:
– Green = available
– Gray = offline
– Red = on a call
- Hover over an agent, then click the
- To delete an agent:
- Hover over an agent, then click the
icon at the far right of the window.
- When a confirmation prompt appears, click Yes to delete the agent or No to retain it.
- Hover over an agent, then click the
- When you finish working within the pop-up window, click Done.
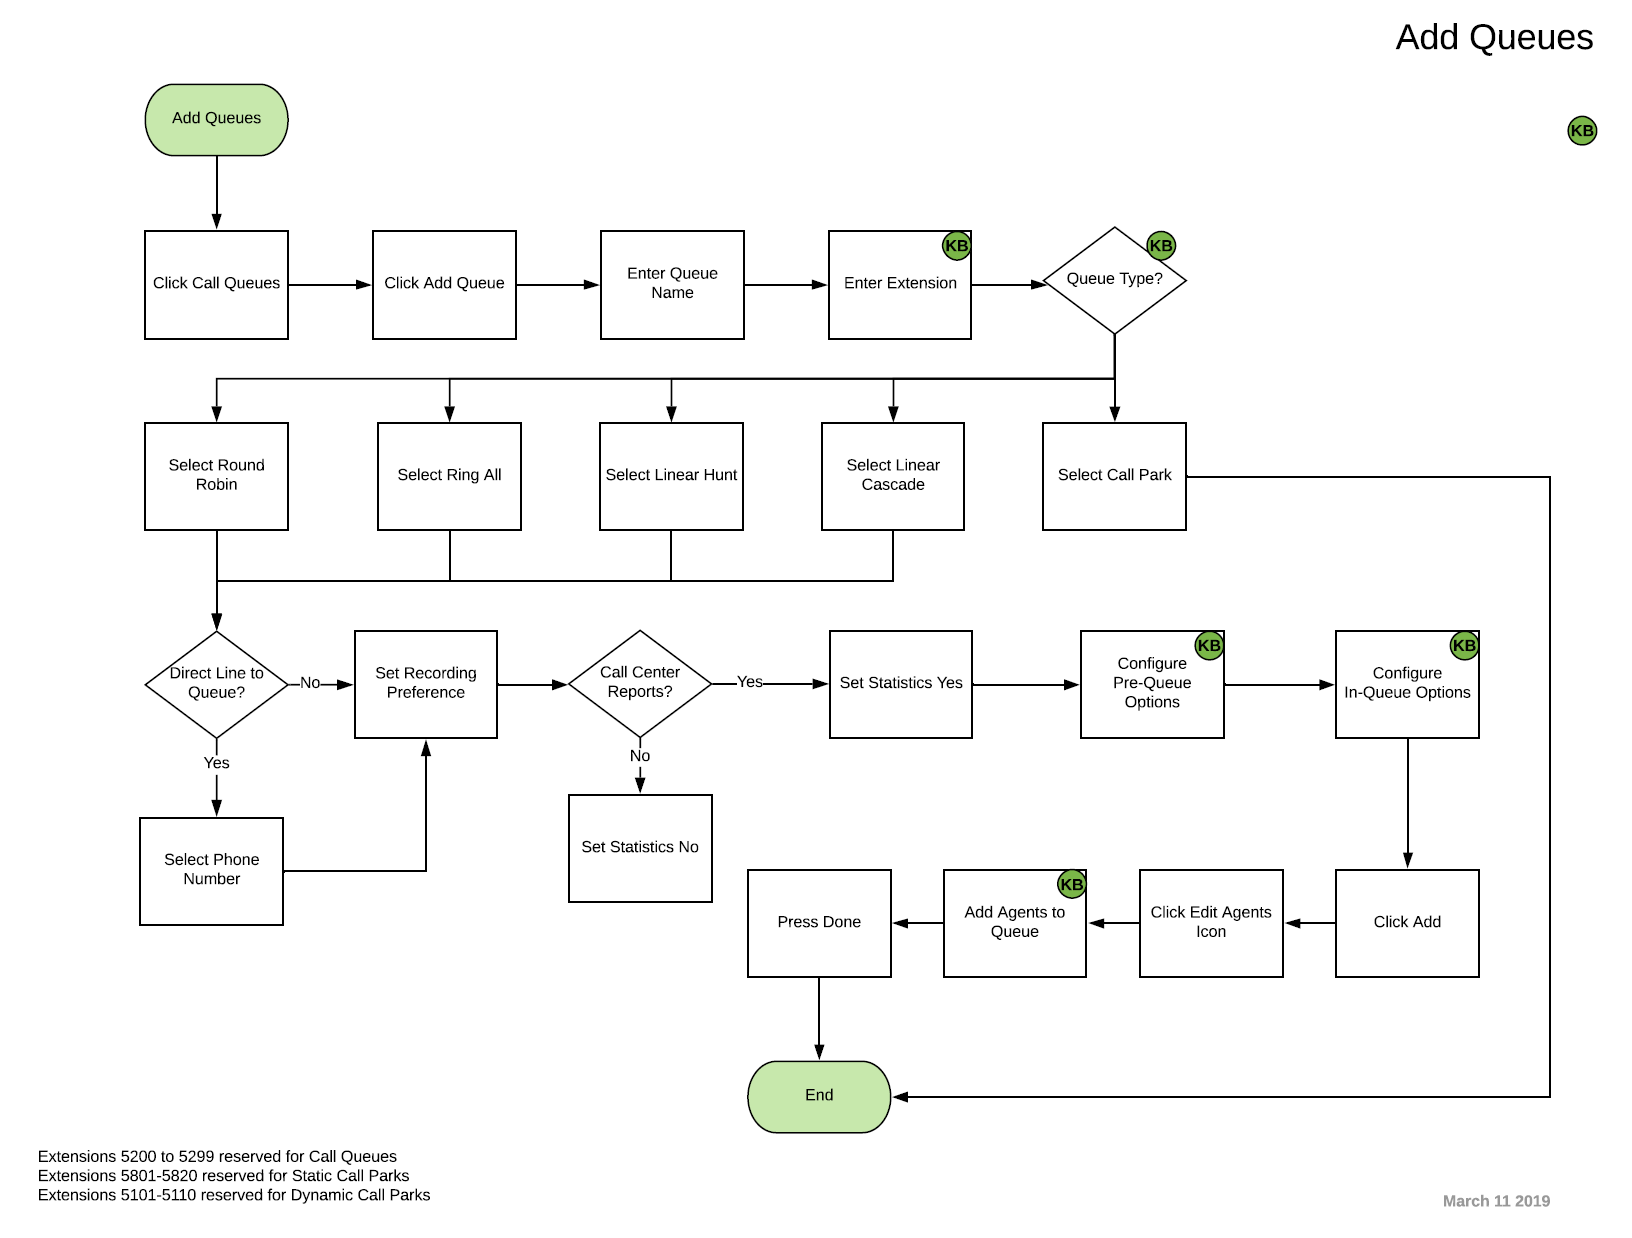
Flowchart